Initial Server Setup
Running Kylo
The easiest way to use Kylo is through the pre-built virtual appliance (sandbox) which can be downloaded on the Kylo.io website. The sandbox includes an installation of Horton Work's Hadoop platform (HDP) and Kylo on CentOS 7. This can be useful for testing, development and demonstration purposes but does not provide a production environment.
Kylo should usually be installed on an edge node within a big data environment. This means it access things like Hive and Spark without having much of an impact on the system. Different parts of software required by Kylo can be moved to other servers if they prove to be a bottle neck, such as the database it uses.
This section covers the installation of Kylo, NiFI and HDP on a new machine to form an all-in-one machine similar to the sandbox from the ground up. Of course, this machine could be a cluster with hundreds of machines. As long as the machine running Kylo has access to the correct Hadoop services it will work fine.
Preliminary Requirements
We will be using AWS to build this test setup. In theory, you can use a physical server, another cloud provider, or even Virtual Box/KVM/Xen/etc to build the machine as well. Here are the requirements for the machine:
- At least 16 GB of RAM
- At least 4 Cores (Physical or Virtual)
- At least 25 Gigabytes of storage
- One Network Interface with a public IP address attached*
* Note: I have tried several times to deploy a subset of all services onto one machine using less hardware resources, but I've had no luck. Using a machine with 8 Gigabytes of ram and 2 vCPU/Cores, the Ambari server crashes during installation and requires a total rebuild every time. It is possible to fix this by installing less services and adjusting the default parameters specific set by Ambari (such as Heap size etc). Although the HDP sandbox runs with less resources, a lot of the services on the sandbox are in maintenance mode, which means they don't consume many resources, hence why it works on a smaller virtual machine.
* The use of a public IP address is dangerous as it exposes the machine to the whole of the web. If we open up the port to Ambari Depending on your VPC setup, you might not want to do this at all as it could expose your company's internal network to the internet (for example, if you're using AWS Direct Connect). Preferably the use of a VPN would be better: Amazon VPN Connections.
Provision the Machine
- First log into AWS (aws.amazon.com), if you don't have an account, create one. Once in, go to Services and find EC2. Once inside EC2 Dashboard, go to Launch Instance.

- Inside Launch Instance, select Red Hat Enterprise Linux 7.3 (specifically Red Hat Enterprise Linux 7.3 (HVM), SSD Volume Type - ami-9c363cf8). If you're reading this in the future, the version has most likely changed, so just pick the latest Red Hat Enterprise Linux (HVM) image.

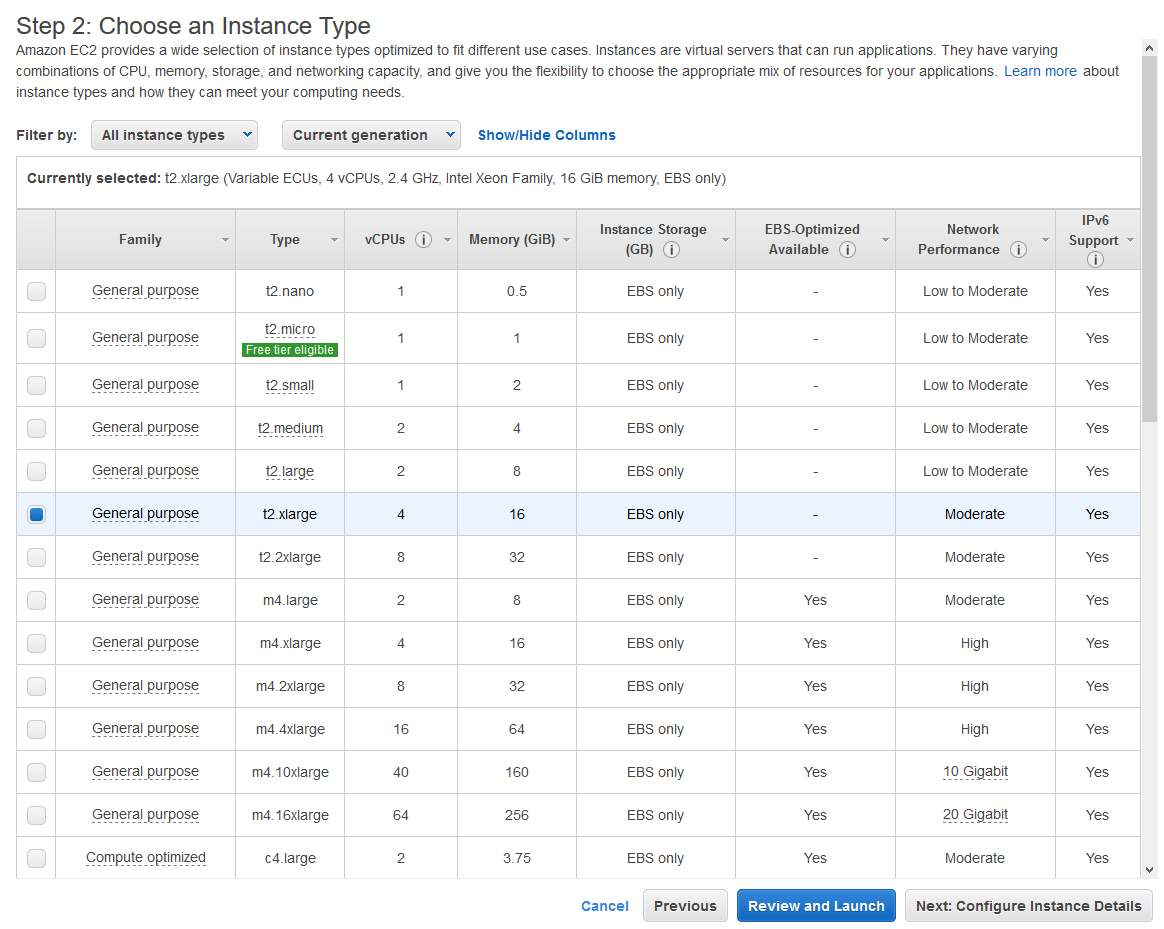
- On the next screen, select the instance type. I used t2.xlarge, which has four vCPU and 16 GiB of memory. Using the t2.large instance may also suffice if you reduce the amount of services you are running.
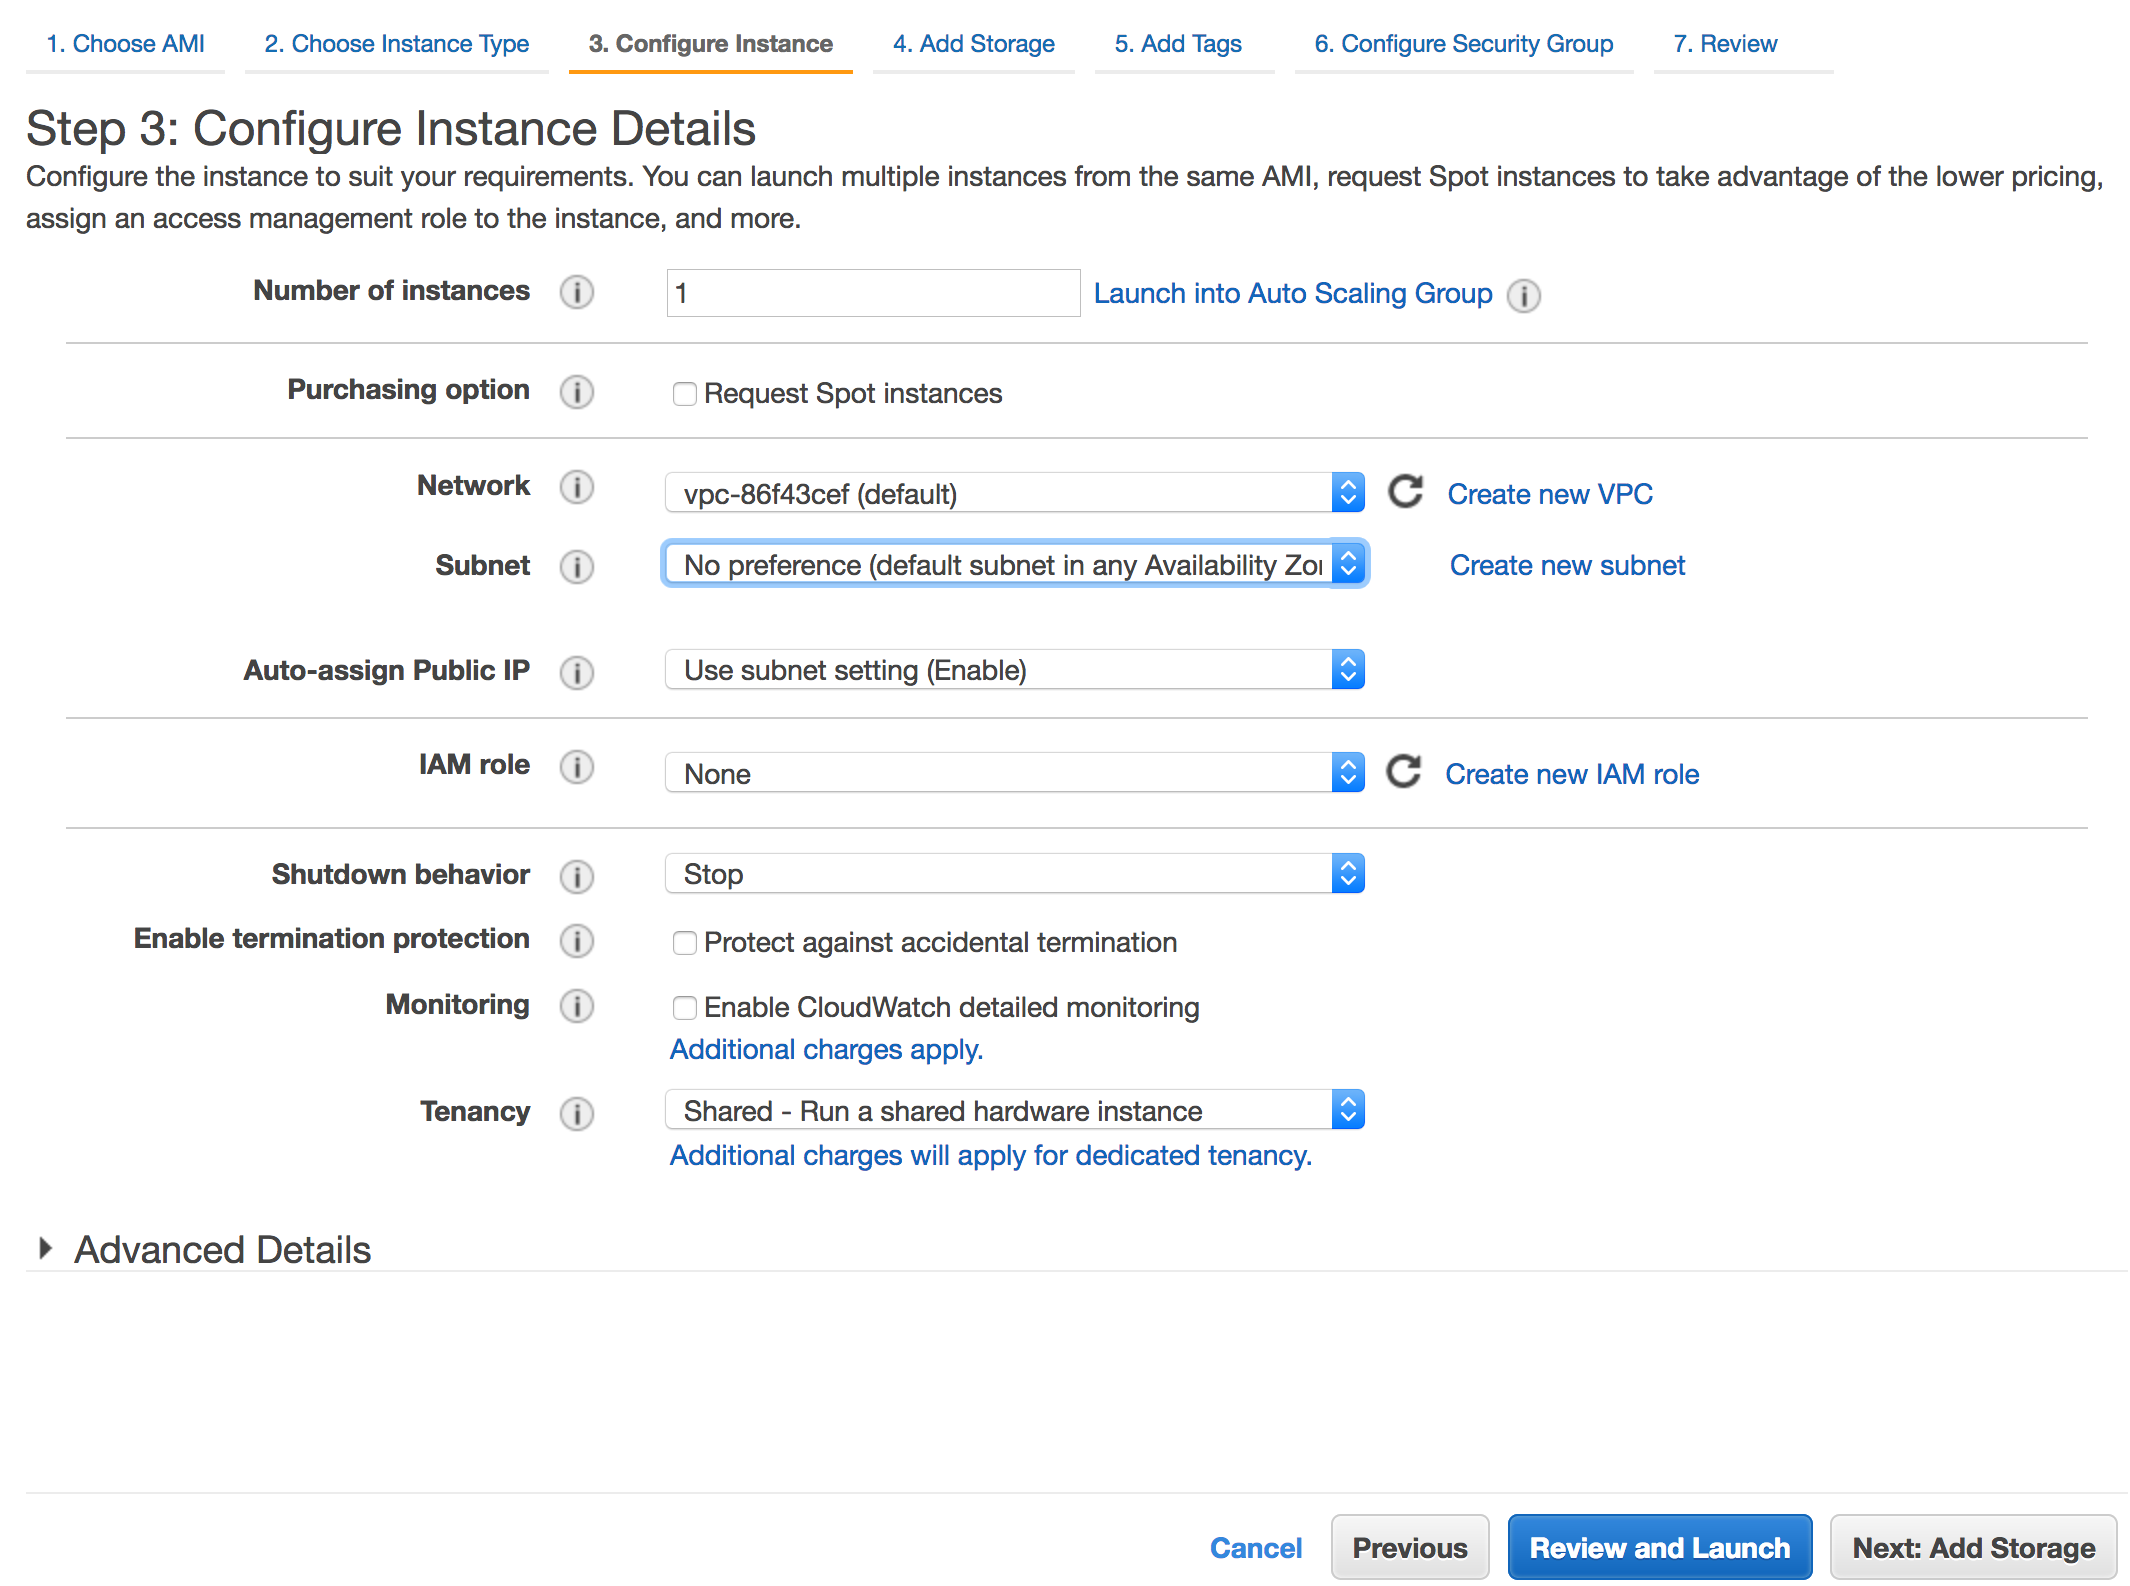
- On the next screen we can set some more instance details such as subnet, network and monitoring. The most useful option for us on this screen is to enable protection against accidental termination. We don't need to change any other details at this point so hit next to add storage.
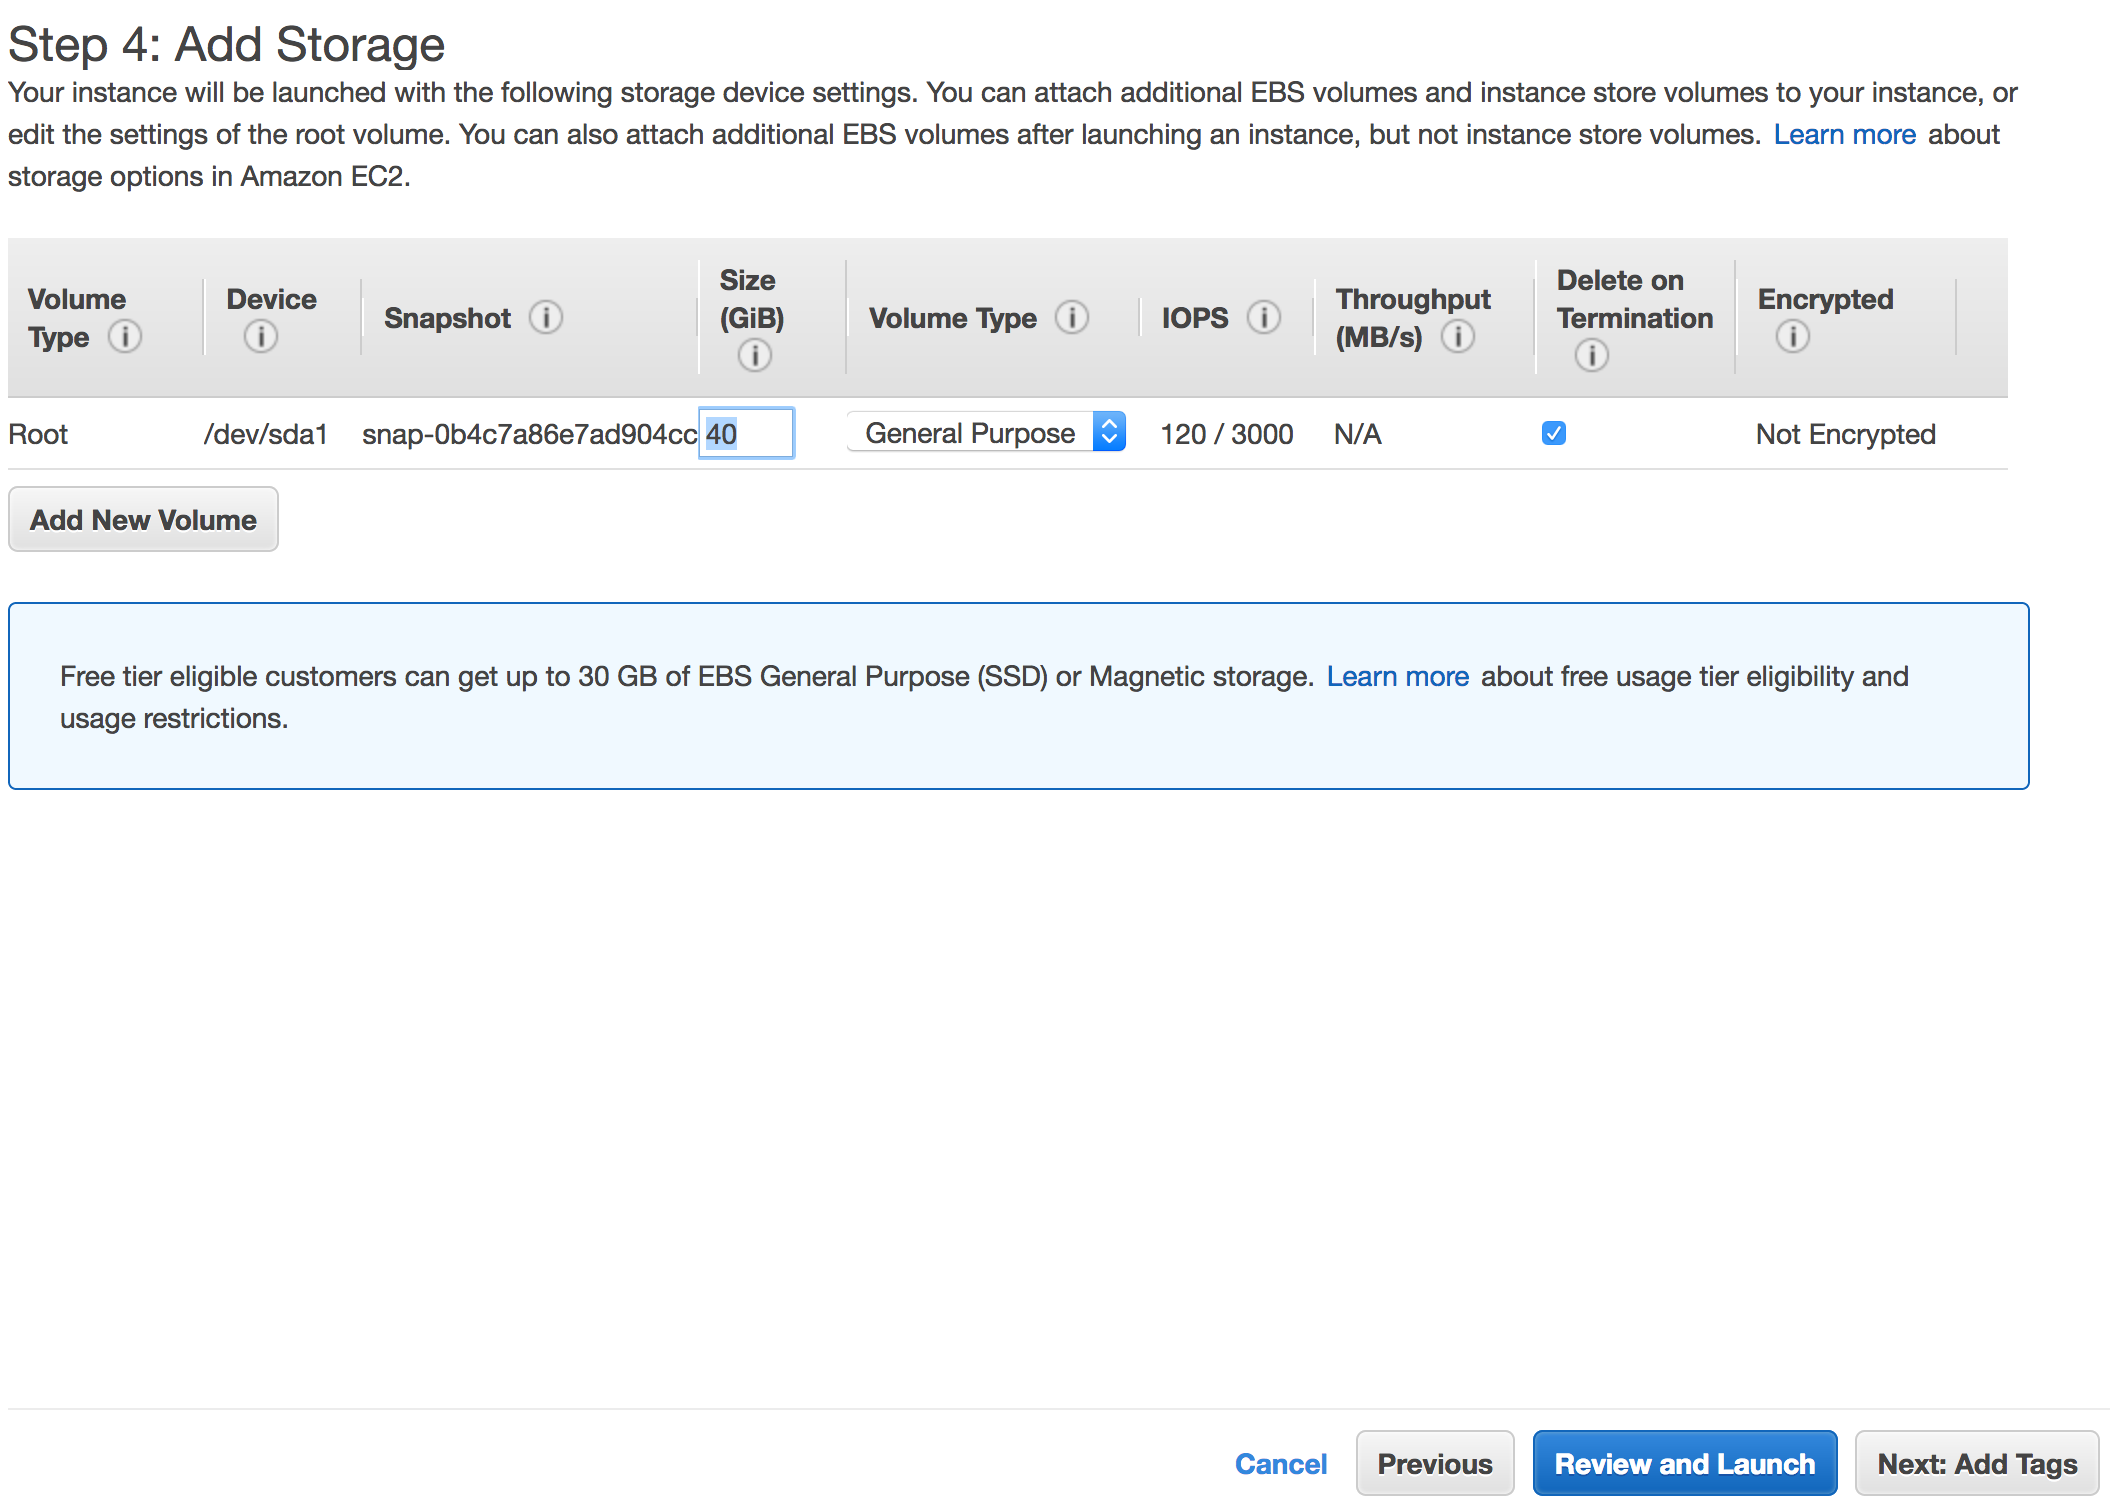
- I recommend changing the default disk size to at least 25 GiB, but you might want to go a little higher, to say, 40 GiB or more if you actually plan to ingest data sets on this machine.
You can either hit the next tab to add some metadata (called tags) for the instance or you can now hit review and launch. At some point AWS will ask you to create a key pair. Create a new key pair and download the private key.
The machine will now boot. However, we have not defined any security groups, so we cannot access it yet.
Defining Security Groups for HDP and Kylo
By default in AWS, all ports are blocked/closed to virtual machines. Security groups must be used to open up connectivity to virtual machines on a port-by-port basis, just like regular firewalls. You can either add all your required ports into a single security or split them into individual groups which can be combined together.
Virtual machines can use multiple security groups at once. For example, I may create a group for ssh (which contains 443) and HTTP (which contains 80 and maybe 8443). If the machine is given the SSH group it will just have 443, but if the other is added, all three ports 443, 80 and 8443 will be opened up.
- First log into AWS (aws.amazon.com), if you don't have an account, create one. Once in, go to Services and find EC2. Once inside EC2 Dashboard, go to Network and Security and then Security Groups.
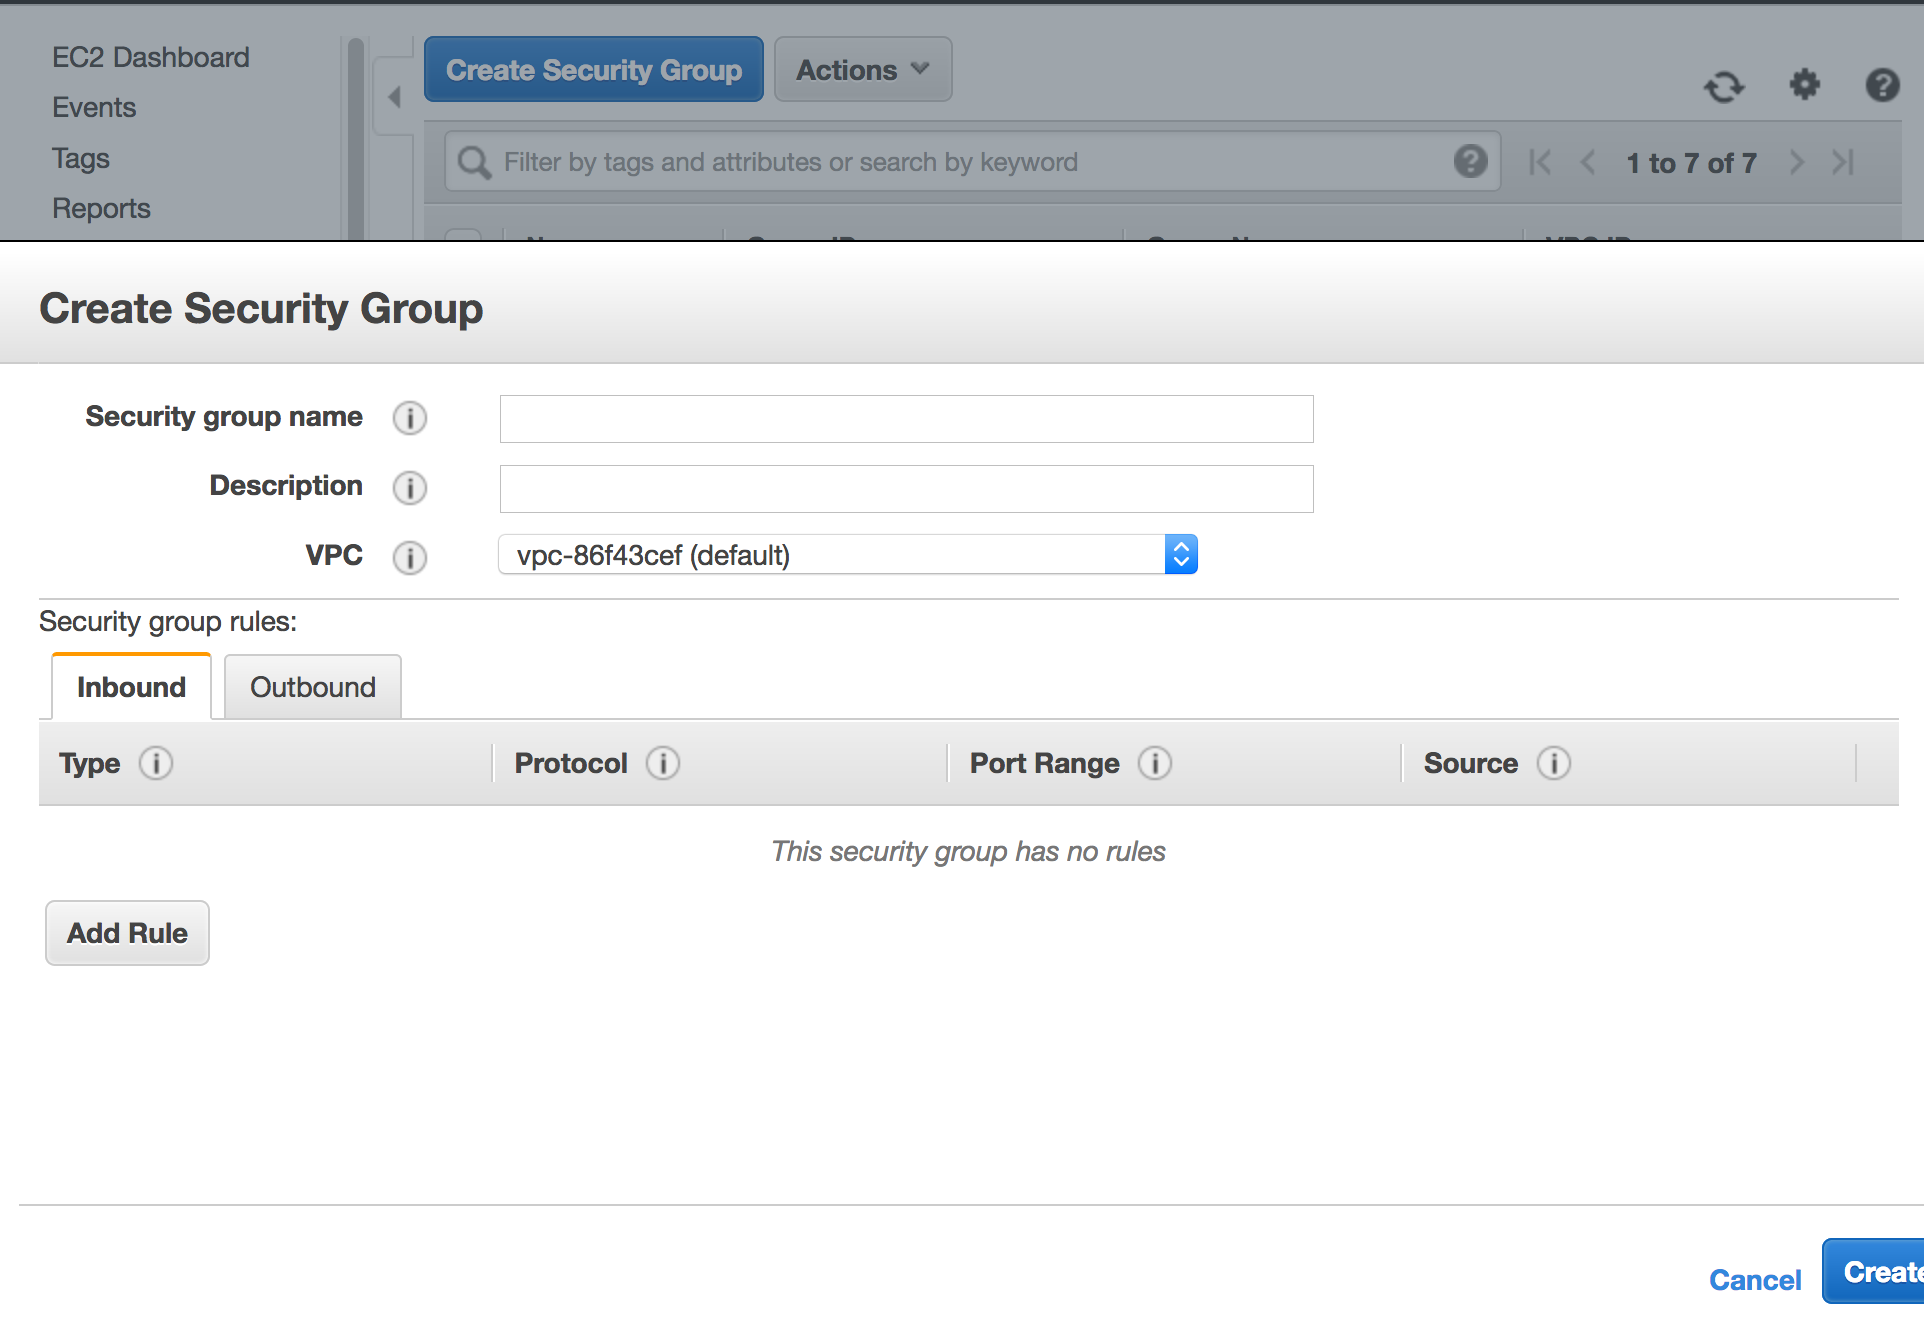
- You will need to create either a single security group or multiple groups. Give the new group a name and a description, the list of ports we need to open are below:
| Service | Port |
|---|---|
| SSH | 443 |
| Kylo-UI | 8400 |
| Ambari GUI | 8080 |
| Ambari Handshake | 8440 |
| Ambari Heartbeat | 8441 |
On the Create security group form, you will want to add new in-bound rules for each port, selecting the Type as Custom TCP. You can limit the Source to your own IP address OR set the source to any ip address. As previously mentioned, this is a security risk.
There are additional Ambari and Kylo ports defined in the manuals which can be opened as required.
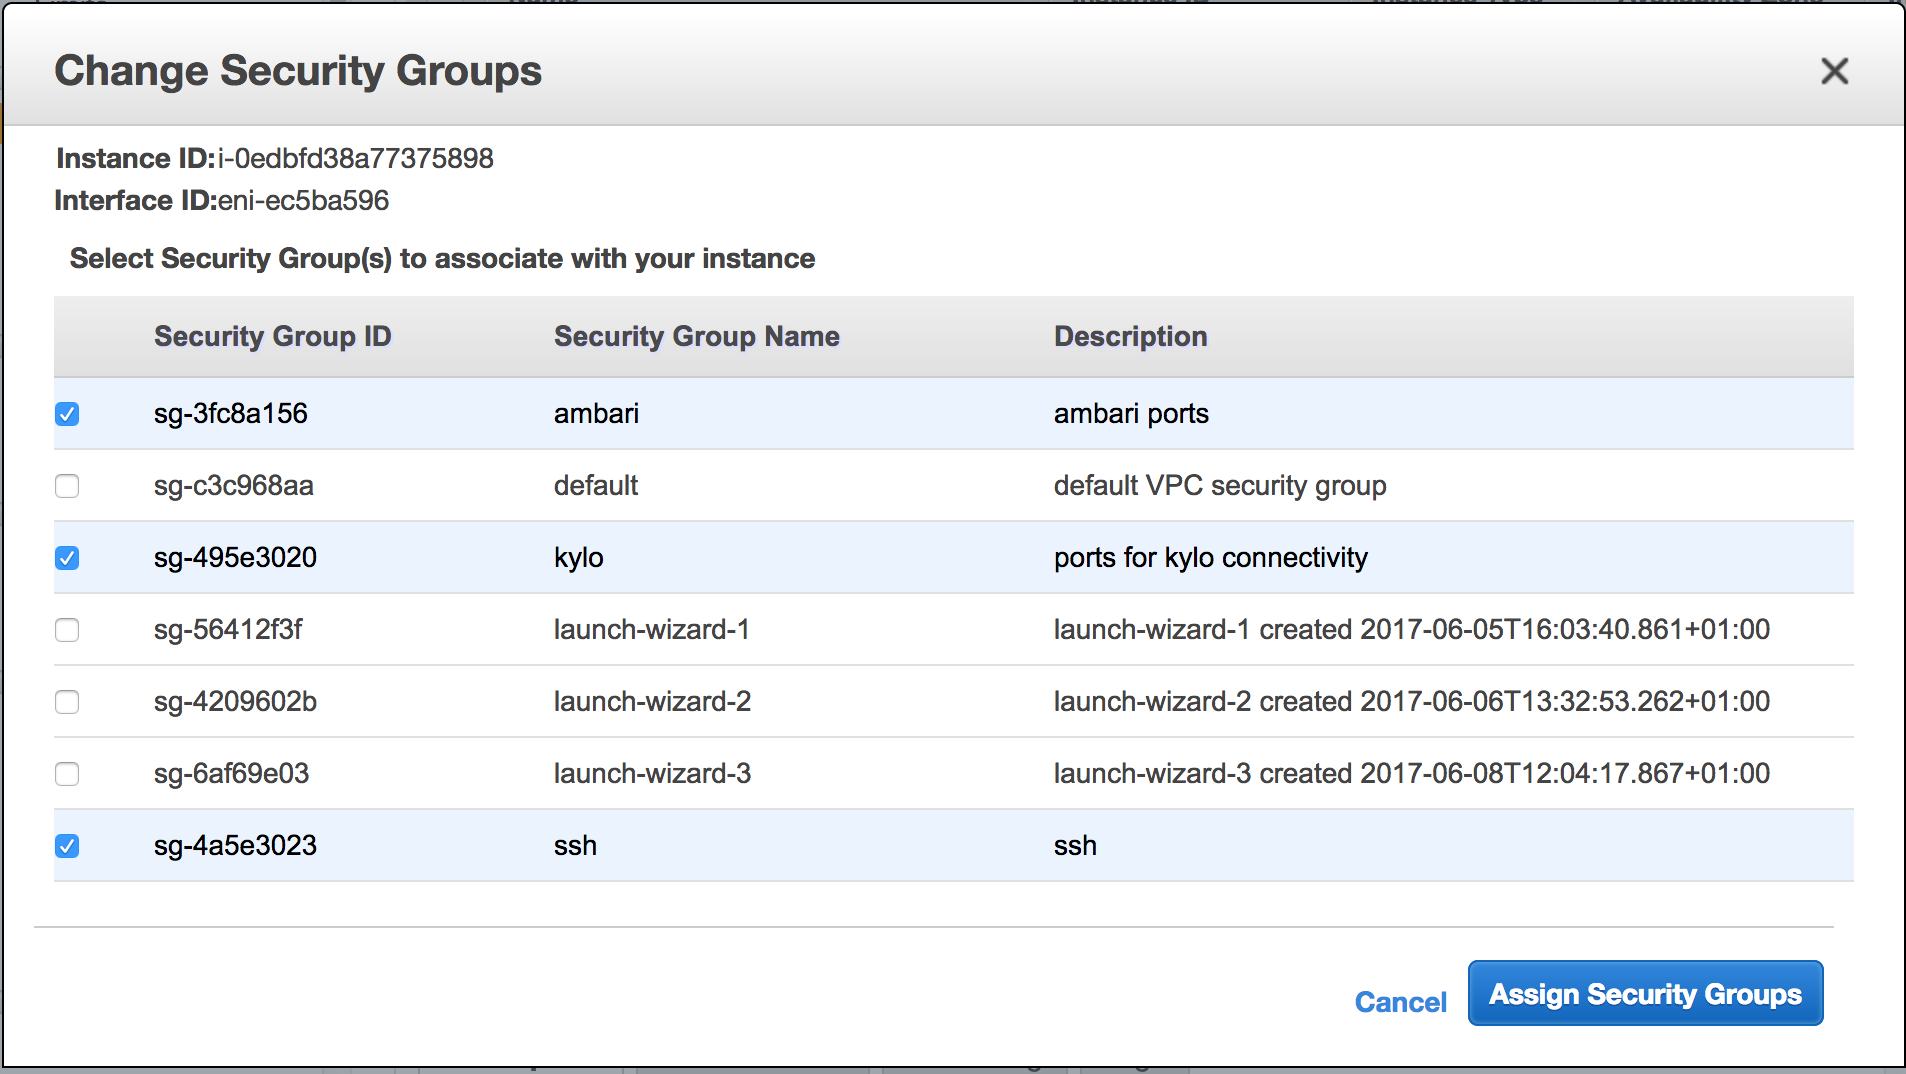
When the groups are defined, go back to EC2, go to Instances and find your machine in the list. Highlight the machine, then go to Actions and then to Networking. From the Networking menu hit 'Change Security Groups' and select the newly created security group(s) you made for the above ports. Finally, hit assign security groups.
Initial Server Configuration
Now our server is ready, we will jump onto it using SSH (knowledge of SSH is already assumed). Using SSH, connect to your server (you may use putty on windows, in which case, you will have to convert your key format):
ssh -i private_key_from_aws.pem [email protected]
* Note: the xx.xx.xx.xx should be replaced with your public ip address for the machine you just provisioned (this can be found by highlighting it in the GUI) and your private key should be the one you downloaded during provisioning.
Accept the finger print and you should be in as ec2-user. This is the default user for RHEL images on AWS. Run the following command to become root:
sudo su
Now we have root, we should update the machine.
yum update -y
We will also change the hostname:
  hostnamectl set-hostname --static kylo.cat-lover-extreme.com &&
  hostnamectl set-hostname kylo.cat-lover-extreme.com
* Note: You don't have to change the hostname for your machine if you don't want to. When you provision a machine on AWS it is automatically given an AWS hostname which is configured with both forward/reverse DNS entries by default. If you wish to use this hostname, make a note of it by typing: hostname -f on your terminal.
This change in hostname can be verified using the command:
hostname -f
Red Hat AMI come with a subscription baked into the cost, which means you don't need to buy an additional subscription to receive updates. By default the optional software repository is not enabled but we need it to install HDP. Lets enable that:
yum-config-manager --enable rhui-REGION-rhel-server-optional
Let's also install wget to make it simpler to download stuff. CURL can also be used, if preferred:
yum install wget -y
* Note: By default, Firewalld and Iptables seem to be disabled, so we don't need to worry about opening ports. However, SELinux is enabled.
* If you change your hostname to something different to the one Amazon gives you when you provision your machine, you will most likely need to edit your host file unless you have DNS servers available. In theory you can use Route53, existing organisational DNS servers or set up your own using something like Bind. My machine's hostname is (kylo.calvinh.thinkbiganalytics.com) and I just edited the /etc/hosts file to add an entry for my private IP address:
  # vi /etc/hosts
  # 172.31.13.60 is the private IP of this machine, replace with yours. Also check that /etc/nsswitch has priority set to files and not dns.
  127.0.0.1   localhost localhost.localdomain localhost4 localhost4.localdomain4
  ::1         localhost localhost.localdomain localhost6 localhost6.localdomain6
  172.31.13.60 kylo.cat-lover-extreme.com kylo
Finally, we've just updated the server and it is quite likely the kernel has been updated, so we should reboot for it to take affect, so we run the command:
reboot now
** At some point yum will become obsolete and DNF will replace it. At that point, you should replace the yum commands with DNF.